I recently bought, and by recently I mean 2019, a HP ProLiant Microserver off an old work colleague. I have a QNAP NAS that I use for all of my media and plex etc, however until I can upgrade and either buy a NAS with VM support or build my own rack server, I need to have two seperate devices running at the same time - which is a bit of a pain.
Up until recently the HP Microserver had a bios on it from 2011, which prevented anything above Windows Server 2008 R2 from being installed on it due to a bug causing the NICS to drop off and not work on Windows Server 2012 R2 or higher. There is a multiude of tutorials online but from all of the searching that I did, I thought I’d note down the stuff that worked from each of them in the hopes this can help someone else in the future.
The hardest part of the entire proces was trying to obtain the SP64420 PAQ that is provided by HP. They’ve locked everything behind a paywall, so unless you have a subscription or your Microserver is still in warranty you can’t obtain it from legal routes. Luckily, there are services online that are hosting it free of charge to prevent you needing to pay for something that HP messed up in the first place.
The steps that are provided with it, and online in general, are a bit crap and slightly confusing; at least they were for my dumb brain. So if you follow the steps below, you should be able to flash the BIOS on your Microserver to the latest available version to get something newer than WS2008R2 working on it.
- Download the SP64420.zip (definitely not linked above….)
- Once downloaded, extract the zip somewhere and double click the exe
- Follow through the installation process, I would recommend doing this to your C drive and NOT to the USB that you’re going to be writing the bios files to
Once installed it should open a page in your web browser called Start.htm. If it didn’t and you didn’t change the install path, it’ll be here: C:\SWSetup\SP64420\start.htm. At the bottom of the page there are two options; Launch HP USB key Setup Creation Utility and another one that we don’t care about. Click that link and it should open up an application.
Select your USB drive from the dropdown and click Start. This will write the BIOS files to your USB that you will plug into the Microserver later. After the installation has finished, you should have something similar to the below on your drive
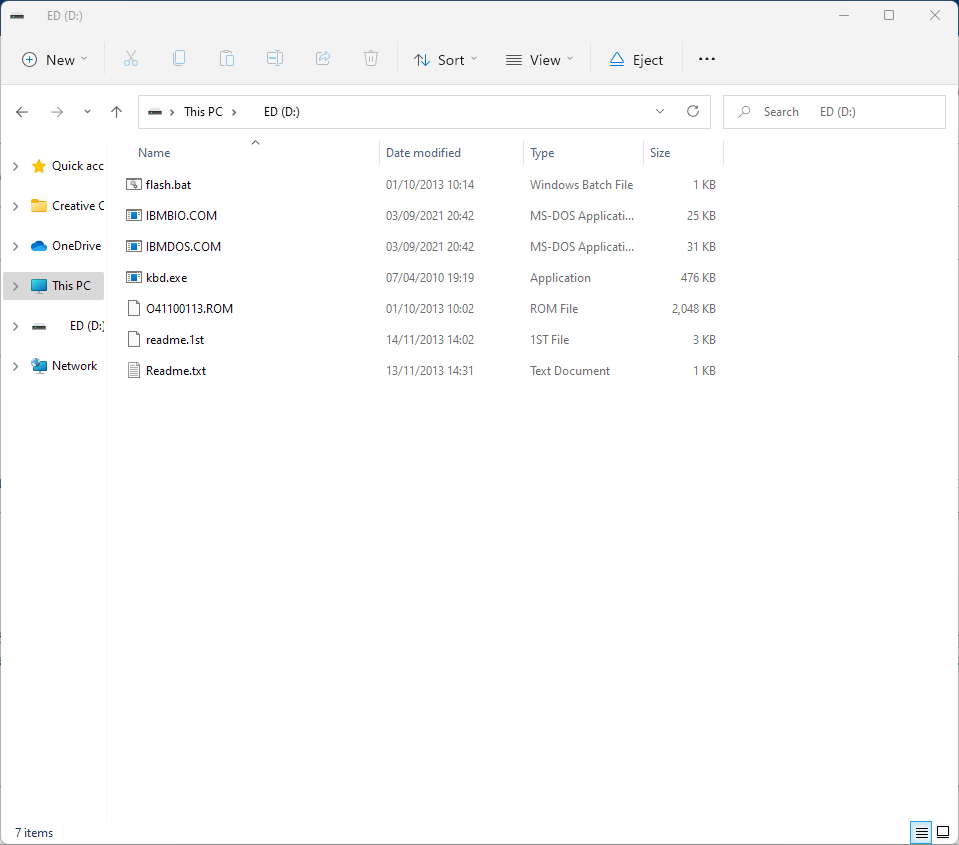
As long as your drive looks like the above, eject it and following the next section. If it doesn’t look like the above, go to USB Utility Sucks.
Drive is the same
Put the USB into your Microserver using one of the built in ports - don’t use a USB 3.0 port if you’ve added a card in. Once the USB is in the system power it on and enter the Bios Menu by spamming F10 until it lets you in.
Once in the Bios Menu move to the third section and change the Boot Device Order so that your first boot device is the USB drive. Press F10 to save and exit your changes and it should boot you into the flashed USB, let it run through its thing and once you see C:\ after a bunch of giberrish, your BIOS has now been flashed to the latest version. If you press CTRL+ALT+DEL it will reboot the server, you should then see at the top of the boot screen your updated bios version.
USB Utility Sucks
Yeah, I had the same problem. This USB Tool seems to absolutely suck. Before proceeding, make sure you’re using a USB that is less than 16GB, I ended up using an old SANDISK 256MB USB that I found under my bed.
If that still doesn’t work, leave a comment and I’ll get back to you with any tips I might have.